How to Draw Fractals - The Basics
Mon 30 December 2019 by A Silent Llama
I love fractals. I love the idea that a few simple rules can produce images of stunning complexity. I remember reading about them as a kid and thinking that you had to be an advanced mathematician to be able to understand or produce anything like them. Now that I’m older I’ve realised that, while they are complex, they can be understood and appreciated by us mere mortals. In this series of blog posts I hope to show how accessible they can be.
So, what is a Fractal?
Wikipedia defines Fractals in terms of something called a ‘fractal dimension’ which is… not the simplest thing for the non-mathematician to understand. The man who coined the term ‘fractal’, Benoit Mandelbrot, defined fractals as “a shape made of parts similar to the whole in some way”.
In the absolute simplest terms a fractal is what happens when you take some process and then repeat it over and over again. That’s basically it.
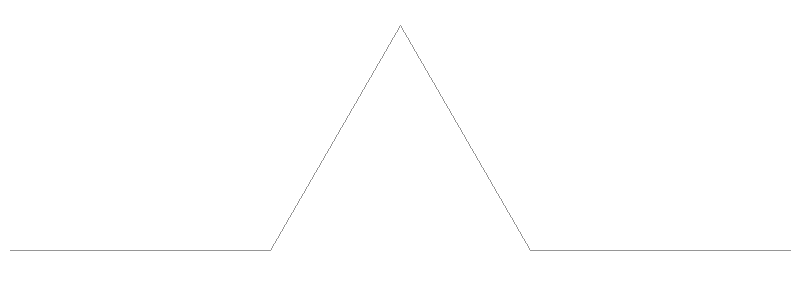
It’s easiest to understand with an example. Let’s start with a pattern:
Now we’re going to replace each line in the above pattern with the same pattern again:
And again:
Last time:
This is an example of a fractal called a Koch Snowflake. This demonstrates the essence of all fractals - we take a simple procedure, in this case replacing lines with a triangular shape, and then we keep repeating the procedure over and over again. The fancy math term for this is an iterated function which basically means a function applied to itself some number of times. We’ll use the term iterations to keep track of how many times we repeat.
An interesting property here is that a fractal is self similar. That is the entire fractal is similar to a part of the fractal. Since we keep repeating the same pattern over and over again this makes sense - the whole picture is made up of the same picture multiple times.
Drawing Fractals
When I first saw how intricate fractals were I assumed they would be difficult to code. But after trying it I realised that they are actually quite simple to draw. However before I get to the easy method I’ll first try and derive how to draw these things from first principles.
I’ll stress that this gets easier as we go - the naive method I’m about to demonstrate is actually one of the harder ways to go about this.
Some preliminaries: Rust
I’ll be using Rust for our examples. If you don’t have Rust installed you can find installation instructions here.
We’ll start with a new project:
$ cargo new fractals
Edit your Cargo.toml file to look like this:
[package]
name = "fractals"
version = "0.1.0"
authors = ["Your name here <an_email_address@some_domain.tld>"]
edition = "2018"

[dependencies]
image = "*"
imageproc = "*"
All we’re doing here is making sure we have the libraries we need to create images.
Rendering
We’ll start with an 800 by 300 image and save it as ‘rendered.png’:
use image::{ImageBuffer, Rgb, GenericImage};
use imageproc::drawing::{BresenhamLineIter};
use std::path::Path;

fn main() {
    // We create a new image buffer - this will be our canvas, a grid of
    // pixels with width 800 and height 300 pixels.
    let mut imgbuf = ImageBuffer::new(800, 300);

    // ...

    //Save the image to the file rendered.png. Quit if anything goes wrong
    // with an error message.
    imgbuf.save(&Path::new("rendered.png")).expect("Unable to save image");
}
You’ll notice that if you try and compile this code (using cargo build) the Rust compiler will give an error. This is because from the information we’ve given it can’t tell what type of image we want. Don’t worry - once we start drawing Rust will be able to work out the type of image we want automatically.
We’ll need to be able to draw lines. Luckily the imageproc library comes with exactly what we need:
fn line(x: u32, y: u32,
        x1: u32, y1: u32,
        image: &mut impl GenericImage<Pixel=Rgb<u8>>,
        colour: &Rgb<u8>) {
    // Get each point on the line from our BresenhamLineIter iterator
    for (x, y) in BresenhamLineIter::new((x as f32, y as f32), (x1 as f32, y1 as f32)) {
        image.put_pixel(x as u32, y as u32, *colour);
    }
}
The BresenhamLineIter is an implementation of the Bresenham line algorithm: an efficient method for drawing lines. It takes a start and end point and returns each point on the line. To draw the line we simply colour a pixel at every point.
Now we need to add a draw_koch function. This function is going to apply our repeated process. Before we can begin we need to understand what is actually happening.
Consider the pattern we’ll be repeating:
We need to draw a horizontal line, then a side of a triangle, another side of the triangle and finally a last horizontal line. Each line drawn is the same length. You may remember from school math that the only triangle with equal sides is an equilateral triangle and that means the angle we need to use for the middle lines is 60 degrees:
Let’s say the total length of our fractal will be 780 pixels. Then each line we draw will be 260 pixels long (since all the lines are the same length it means the ‘missing line’ at the bottom of the triangle is also 260 pixels long and we therefore divide our total length by 3 i.e. 780 / 3 = 260).
We’ll represent our points with (x,y) coordinates. To draw the first horizontal line we start at, say, point (0, 250) and end at (260, 250). Now comes the tricky bit - we need to draw a line from (260, 250) at an angle of 60° which has the same 260 pixel length.
You might remember the following from basic trigonometry:
Since sin is the ratio between the hypotenuse (our radius r) and the opposite side (our y coordinate) to find y we’ll need: r * sin(60°) and similarly our x coordinate is going to be r * cos(60°).
So we’ll need to draw a line from (260, 250) to (260 + 260 * cos(60°), 250 - (260 * sin(60°))). If you’re wondering why we’re subtracting from the y value of our initial point it’s because we want to draw up - in a normal cartesian plane going ‘up’ increases the y coordinate but our image starts at (0, 0) in the top left corner and hence the y coordinate increases as we move down. We need to compensate for this.
We’re ready to try and draw this (Note - the rust compiler will now know that we’re dealing with Rgb images because of the call to put_pixel and our code will now compile):
use image::{ImageBuffer, Rgb, GenericImage};
use imageproc::drawing::{BresenhamLineIter};
use std::path::Path;

fn line(x0: i32, y0: i32,
        x1: i32, y1: i32,
        image: &mut impl GenericImage<Pixel=Rgb<u8>>) {
    for (x, y) in BresenhamLineIter::new((x0 as f32, y0 as f32), (x1 as f32, y1 as f32)) {
        image.put_pixel(x as u32, y as u32, Rgb([150, 150, 150]));
    }
}

// Rust's math operations use radians internally - we'll need to
// convert our degrees into radians to use them. There is good
// reason for this: radians are generally more useful than degrees.
// However degrees are easier to understand so we'll keep using them
// and convert them when we need to:
fn to_radians(angle: f32) -> f32 {
    (angle * std::f32::consts::PI) / 180.0
}

fn draw_koch(imgbuf: &mut impl GenericImage<Pixel=Rgb<u8>>,
             total_length: i32) {
    let side_length = total_length / 3;
    let rad_angle = to_radians(60.0);

    let midpoint_x = (side_length as f32 * rad_angle.cos()) as i32;
    let midpoint_y = (side_length as f32 * rad_angle.sin()) as i32;

    // Draw a horizontal line from our start position to one third of our side length:
    line(0, 250, side_length, 250, imgbuf);
    // Draw the first side of the 'triangle'
    line(side_length, 250, midpoint_x + side_length, 250 - midpoint_y, imgbuf);
    // Draw the second side of the 'triangle'
    line(midpoint_x + side_length, 250 - midpoint_y, side_length * 2, 250, imgbuf);
    // Draw our final horizontal line:
    line(side_length * 2, 250, side_length * 3, 250, imgbuf);
}

fn main() {
    let mut imgbuf = ImageBuffer::new(800, 300);
    draw_koch(&mut imgbuf, 780);
    imgbuf.save(&Path::new("rendered.png")).expect("Unable to save image");
}
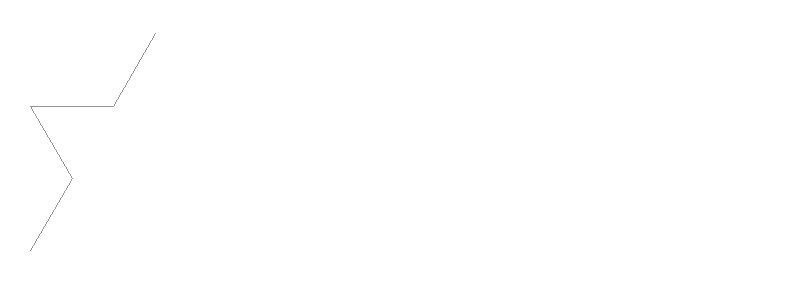
Running this program (cargo run) produces the following image:
Awesome. We’re getting there. There’s one small wrinkle left though - the routine above assumes we’re drawing our pattern horizontally. However we need to be able to draw our pattern at an angle since some of the lines we’re replacing will be at an angle too. We’ll change draw_koch to take an initial angle:
fn draw_koch(imgbuf: &mut impl GenericImage<Pixel=Rgb<u8>>,
             total_length: u32,
             angle: f32)
And now we need to use the same trigonometry functions for all our lines so we’ll move it into it’s own function. Note how Rust allows us to use a tuple as the return type:
fn calculate_endpoint(x: i32, y: i32, angle: f32, length: f32) -> (i32, i32) {
    // We use the basic trigonometric identities to work out
    // where a line drawn at a given angle of a given length
    // will end.

    // Read dx as 'difference in the x direction' and
    // dy as 'difference in the y direction'.
    let dx = (length * (to_radians(angle)).cos()).round() as i32;
    let dy = (length * (to_radians(angle)).sin()).round() as i32;
    // The endpoint is calculated by taking our position where we started,
    // (x, y), and adding the difference on each axis that we just calculated.
    // Note: We *subtract* from y to move up. We need to do this because the
    // trigonometry functions we just used assume we started at the origin.
    (x + dx, y - dy)
}
And then we’ll use this function for each line we have to draw:
fn draw_koch(imgbuf: &mut impl GenericImage<Pixel=Rgb<u8>>,
             total_length: f32,
             angle: f32) {
    let side_length = (total_length / 3.0) as f32;

    let (end_x, end_y) = calculate_endpoint(x, y, angle, side_length);
    let (end_x2, end_y2) = calculate_endpoint(end_x, end_y, angle, side_length);
    let (end_x3, end_y3) = calculate_endpoint(end_x2, end_y2, angle, side_length);
    let (midpoint_x, midpoint_y) = calculate_endpoint(end_x, end_y, angle + 60.0, side_length);

    line(10, 250, end_x, end_y, imgbuf);
    line(end_x, end_y, midpoint_x, midpoint_y, imgbuf);
    line(midpoint_x, midpoint_y, end_x2, end_y2, imgbuf);
    line(end_x2, end_y2, end_x3, end_y3, imgbuf);
}

fn main() {
    let mut imgbuf = ImageBuffer::from_pixel(800, 300, Rgb([255, 255, 255]));
    draw_koch(&mut imgbuf, 250.0, 60.0);
    imgbuf.save(&Path::new("rendered.png")).expect("Unable to save image");
}
All we’re doing is calculating the end points of each line given a starting angle. The midpoint (the tip of the triangle) uses the starting angle plus 60°.
Running this with a starting angle gives us this:
We now have a routine that can draw our pattern at any angle we like. All we need to do is repeat it. However to repeat things we need to pass along some extra information:
- We need to specify our starting point.
- We need to specify how many iterations we want.
Let’s make draw_koch repeatable:
fn draw_koch(imgbuf: &mut impl GenericImage<Pixel=Rgb<u8>>,
             iterations: u16,
             x: i32,
             y: i32,
             total_length: f32,
             angle: f32) {
    let side_length = total_length / 3.0;

    let (end_x, end_y) = calculate_endpoint(x, y, angle, side_length);
    let (end_x2, end_y2) = calculate_endpoint(end_x, end_y, angle, side_length);
    let (end_x3, end_y3) = calculate_endpoint(end_x2, end_y2, angle, side_length);
    let (midpoint_x, midpoint_y) = calculate_endpoint(end_x, end_y, angle + 60.0, side_length);

    if iterations == 0 {
        // Last iteration - do the actual drawing:
        line(x, y, end_x, end_y, imgbuf);
        line(end_x, end_y, midpoint_x, midpoint_y, imgbuf);
        line(midpoint_x, midpoint_y, end_x2, end_y2, imgbuf);
        line(end_x2, end_y2, end_x3, end_y3, imgbuf);
    } else {
        // The easy way to repeat a pattern - we simply call draw_koch again
        // every time we want to repeat. We pass in the coordinates and length
        // of the line we *would* have drawn - draw_koch will then replace it with
        // the pattern. Note that we decrease our iteration - we only do the
        // actual drawing when our iterations counter hits zero.
        draw_koch(imgbuf, iterations - 1, x, y, side_length, angle);
        draw_koch(imgbuf, iterations - 1, end_x, end_y, side_length, angle + 60.0);
        draw_koch(imgbuf, iterations - 1, midpoint_x, midpoint_y, side_length, angle - 60.0);
        draw_koch(imgbuf, iterations - 1, end_x2, end_y2, side_length, angle);
    }
}

fn main() {
    // We create a new image buffer - this will be our canvas, a grid of
    // pixels with width 800 and height 300 pixels. The default colour will
    // be white.
    let mut imgbuf = ImageBuffer::from_pixel(800, 300, Rgb([255, 255, 255]));

    // The starting data for our fractal:
    let iterations = 5;
    let fractal_length = 780.0;
    let start_angle = 0.0;
    let start_x = 10;
    let start_y = 250;

    // Draw the darn thing!
    draw_koch(&mut imgbuf, iterations, start_x, start_y, fractal_length, start_angle);

    // Save the image to the file rendered.png. Quit if anything goes wrong
    // with an error message.
    imgbuf.save(&Path::new("rendered.png")).expect("Unable to save image");
}
If we run this with no iterations we’ll get our same pattern back. However we can try 5 iterations to see what happens:
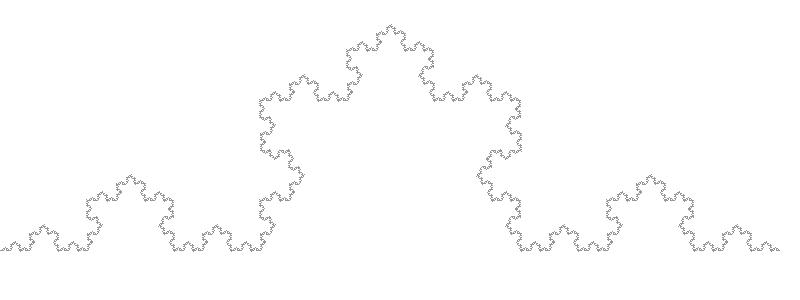
And we finally have a real fractal!
Six iterations gives us this:
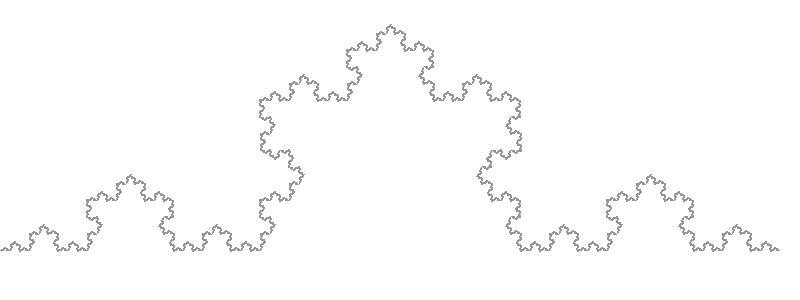
There’s no point going for more iterations since our final line length will be smaller than a single pixel.
Source code for this post is available at Gitlab.
That was hard!
It was. Now imagine we wanted to draw a different fractal maybe with a square pattern instead of a triangular one. We’d need to go through all our logic again carefully working out our angles from scratch. Not only our version above has a lot of function calls - 4 per iteration. We could end up overflowing our stack. All in all this isn’t a very good solution at all. Is there a better way?
There is and we’ll see that in the next post.